 When it comes to installing insulation in your next new build construction project, the goal is to achieve optimum performance at the most affordable price possible. In many ways, insulated plasterboard is an excellent solution.
This convenient and affordable option promises insulation built directly into the plasterboard, so there’s no need for an additional installation of insulation. As a result, you’ll save time and money for the same level of effectiveness in the end.
Plus, with the residential sector being responsible for 19% of Ireland’s energy-related Co2 emissions, reducing the nation’s emissions in the most convenient and affordable way possible is a must.
But if you’re new to using insulated plasterboard and are considering using it for your next project, you probably have a few questions. For example, how is insulated plasterboard installed? What are the benefits of using it? And can insulated plasterboards be installed over existing plasterboards?
Explore the answers to these questions and more with our ultimate guide to installing insulated plasterboard.
What is Insulated Plasterboard?
In case you’ve not already come across this material in your previous projects, we’ll take a quick look at this popular and convenient alternative to traditional insulation and where it’s used.
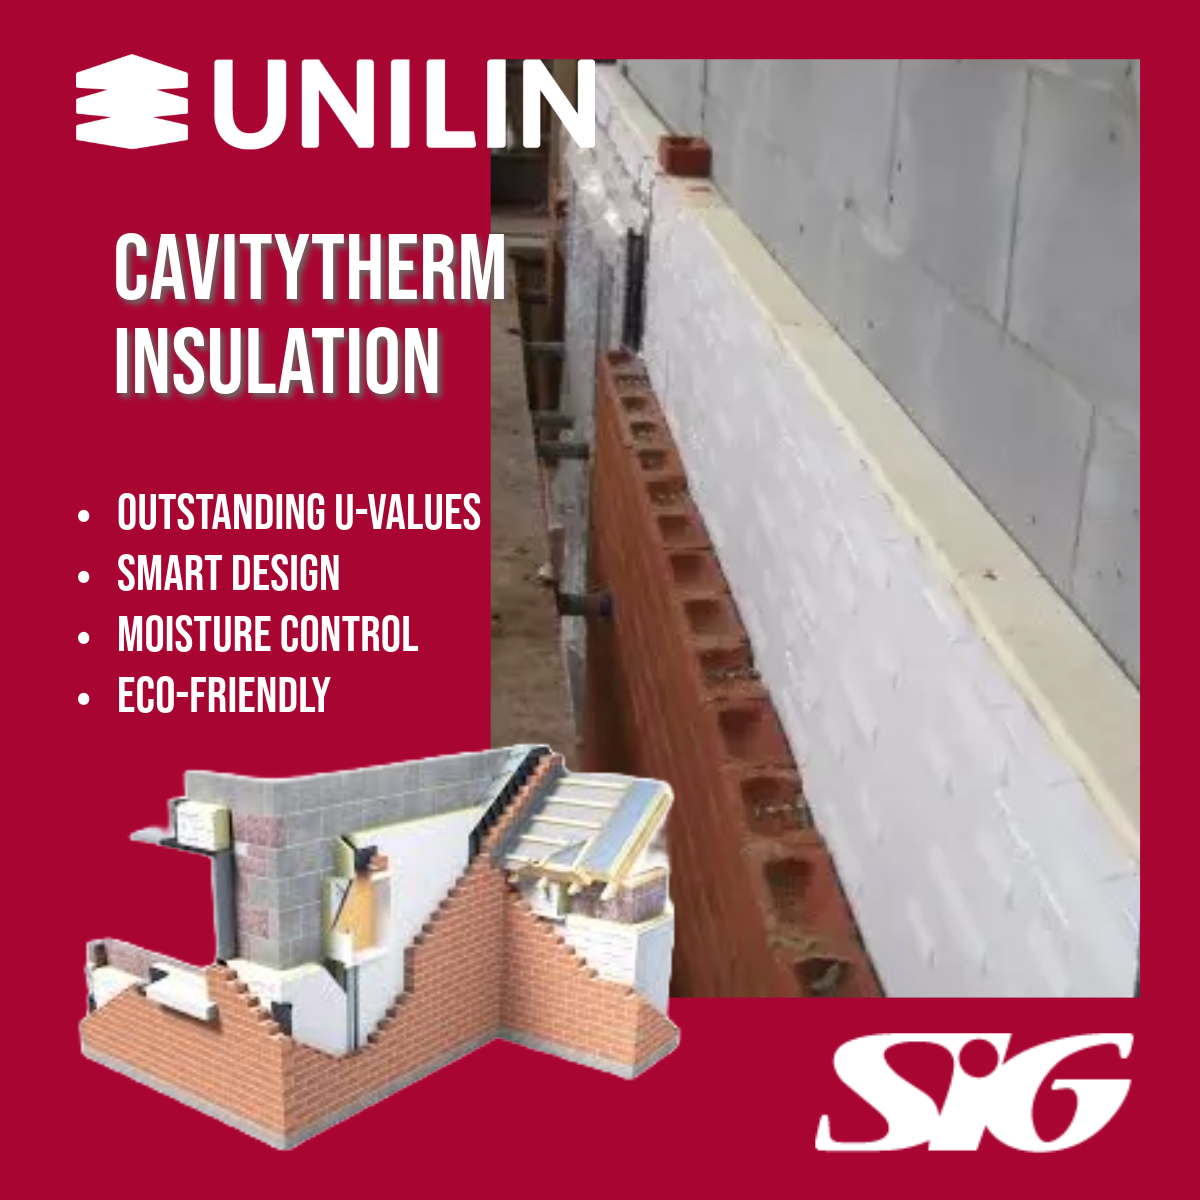
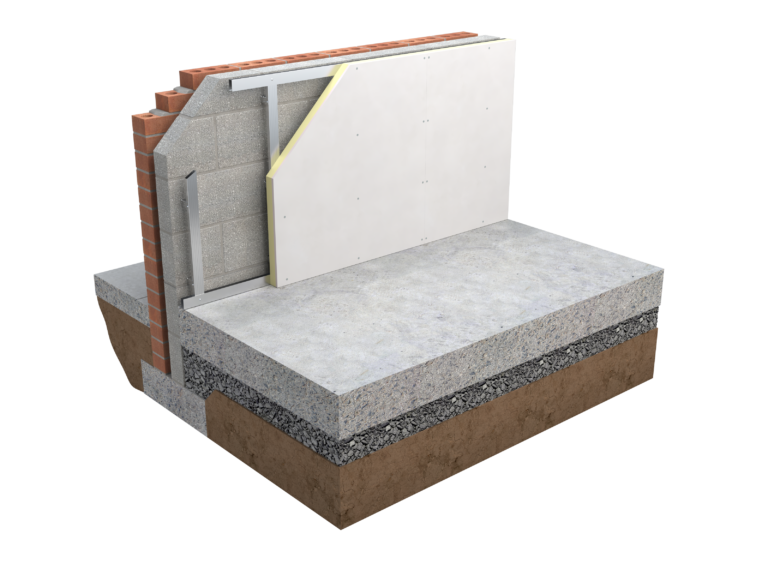
Insulating plasterboards are a construction material that combine plasterboard and insulation in one product.
These boards typically comprise a layer of gypsum board combined with a layer of insulation, which tends to be made from PIR. The standard size for insulating plasterboards is 2.4 metres long and 1.2 metres wide, although there’s a huge variation in thickness across different materials.
There are foil-backed varieties of insulated plasterboard, too, with the foil serving as a built-in vapour barrier. This can be a little harder to install, however, since you’ll need to ensure the continuity of the barrier at joints.
Insulating plasterboards are commonly found in new-build projects as a way to improve the energy efficiency of a home while saving on the costs involved in purchasing the two materials (plasterboard and insulation) separately. It also works exceptionally well in smaller homes with space restrictions, where you might not be able to install the thickness of insulation you’d usually see.
Insulated plasterboard is cheaper than external wall insulation per square metre, so if you’re called out to install insulation on an existing property but the owner is on a strict budget, insulated plasterboard can be a more affordable alternative.
Why Use Insulation-Backed Plasterboard?
Typically, plasterboard and insulation are used as two separate products. This is especially true when you’re retrofitting a property with insulation – it likely already has plasterboard installed so it can be easier to apply insulation on top rather than remove and re-fit the plasterboard with an insulated alternative.
When you’re constructing a new build from scratch, however, you have the option to use the two products separately or use a combined version.
There are times when you’ll still want or need to use the two products separately, as is tradition, particularly when you want a thicker layer of insulation. But if you are considering insulated plasterboard for your next project, these are some of the benefits you can expect to enjoy.
 Saves on installation time
When you’re working on a construction project, time is of the essence. With deadlines to meet to keep the end client happy, even just one task that takes longer than anticipated can cause problems for your project.
Insulating plasterboard eliminates the need to install plasterboard and insulation separately, reducing the labour time needed for construction.
Lowers costs
On some construction projects, budget is the key consideration. Your job is to make sure the property functions as effectively as possible while keeping costs low. Finding affordable products without compromising quality can be difficult, but insulation-back plasterboard provides a great alternative.
Improve the building’s energy performance
Naturally, a building with excellent energy performance is attractive to buyers. The more thermally efficient a property is, the less the residents will have to pay for energy bills. Plus, the lower the carbon footprint of the home, the better for the planet.
Can function as a vapour barrier
Any insulation installer knows that condensation and damp issues are a key insulation concern. In fact, when improperly installed or when the wrong materials are used, insulation can be a catalyst for damp issues, rather than preventing them.
The good thing about insulated plasterboard is that some varieties come with an in-built vapour barrier – a layer of material applied to the back of the plasterboard that prevents water vapour from passing through the material.
This vapour barrier is usually made from foil and applied to the insulation before being laminated to the plasterboard. Even without a foil vapour barrier, PIR-insulated plasterboard can function as a sort of vapour barrier due to its closed cell structures, although it’s always worth buying a vapour barrier separately.
Not only does installing an insulation-backed plasterboard with a vapour barrier help to prevent unwanted condensation from building up, but it also saves money because you won’t have to purchase the vapour barrier separately.
Creates a more comfortable home
In Ireland, which is well-known for its wet and cold winters, maintaining a more consistent temperature within the home can make it much more comfortable for residents. The same goes for summer when insulation can stop excess heat from entering the home and therefore keep it cooler inside.
And it’s not just for private homes, either. Consider spaces like care homes, in which the health of the residents is key. Insulated plasterboards can make the home more pleasant for staff and residents alike.
Are There Any Downsides to Insulated Plasterboard?
As with any insulation material, there are pros and cons to insulated plasterboard. For one, insulated plasterboard can be trickier to fit because it’s heavier than both traditional plasterboard and some types of insulation.
You might also find that insulated plasterboard is slightly less effective than traditional insulation, depending on which insulating material you use. Not every insulation material can be fixed to plasterboard to create insulation-backed plasterboard, so you have slightly fewer options.
Plus, insulated plasterboard is much easier to install in new homes during the construction process. Trying to retrofit insulated plasterboard into existing homes is a lot trickier.
Despite a few negatives, for the most part, insulated plasterboard provides an excellent solution for increased thermal efficiency in homes and workplaces.
What Sizes of Insulated Plasterboard Are Available?
Just as with regular insulating materials, the thickness of the insulated plasterboard will determine, in part, how effective it is. Thicknesses tend to range from 22mm-102mm. In general, the thicker the material, the better the insulation, however, some materials will be more effective than others.
You’ll also need to consider where you’re installing the plasterboard to determine the suitable thickness. If you’re limited by the space in a cavity wall, for example, you might require less than you’d need for a solid wall.
The size plays a role, too. Common sizes of insulated plasterboard include:
- 2400mm x 1200mm
- 1200mm x 450mm
- 1200mm x 1200mm
Opting for a larger size can help you cover a surface more quickly. Some plasterboards even come with tapered edges, making them quicker and easier to install.
Special Considerations for Installing Insulated Plasterboards
As with any insulation project, there are a few things to consider before diving into installation.
Insulated Plasterboard for Ceilings
If you plan on fixing insulated plasterboard onto a ceiling, use a lightweight plasterboard option and avoid installing the plasterboard with adhesives. You’ll need to give the plasterboard the greatest chance possible of staying fixed to the ceiling.
Damp Walls
Just like with regular insulation, installing insulated plasterboard as a means to cover up dampness or even an attempt to rectify it is a no-no. Using insulated plasterboard in damp spaces can lead to the moisture being soaked up by the insulation and damaging it or causing mould.
Instead, if you encounter a damp wall or space, make sure the damp is addressed before you go ahead with any insulation or insulated plasterboard. There’s always the option to install a floating wall away from the damp wall, but you’ll lose a significant amount of space in the room by doing so.
Small Spaces
While it won’t be noticeable in large rooms like large bedrooms, living rooms and dining rooms, you will lose space by installing insulated plasterboard in a room. Lining walls can make a room such as a cloakroom or a bathroom smaller, so bear that in mind before going ahead.
You might decide that the benefits of insulated plasterboard are outweighed by the loss of space in this scenario.
Heavy Fixtures
If you’ve installed insulated plasterboard, especially using the dot and dab method, hanging heavy fixtures, such as a large mirror, on the plasterboard can threaten its stability. Instead of hanging fixtures straight onto the plasterboard, consider other methods.
On stud walls, you can strategically place lumber battens directly behind hanging points to reinforce the insulated plasterboard. For masonry walls, you can screw all the way to the brick underneath.
Vapour Barriers
If the insulated plasterboard you’ve chosen to use doesn’t come with an in-built metal vapour barrier, consider installing one yourself. That way, you can avoid damp and condensation occurring and leading to mould growth.
Skirting Boards and Window Ledges
If you’re constructing a property from scratch and you’ll be installing skirting boards and window ledges after the plasterboard anyway, simply make sure there’s adequate space for the thickness of the plasterboards to be installed.
If you’re renovating a home to replace existing plasterboard with insulating plasterboard (or even add the plasterboard on top), the skirting boards and window ledges will have to be removed and re-added to accommodate for the thickness of the material.
Sockets
If you’re insulating an internal wall, any existing sockets may need to be moved to accommodate the insulated panel or plasterboard. If the wire for the socket is slack, you may be able to tighten it and pull it forward without having to move the socket up or down.
Failing that, move the socket upwards or downwards to allow the wires to reach the new placement of the wall.
Radiators
With any insulation project on existing walls, you may need to remove and replace radiators in another part of the home or on the newly lined walls. Before doing so, turn off the flow of water through the radiator by turning off the metal cap on the left of the radiator with an Allen key.
Then find the grey part of the valve on the right side of the radiator and screw it down, before turning the thermostat to zero. Unscrew the connection between the radiator and the valve, using a small bucket or container to catch any drips or water that may be released.
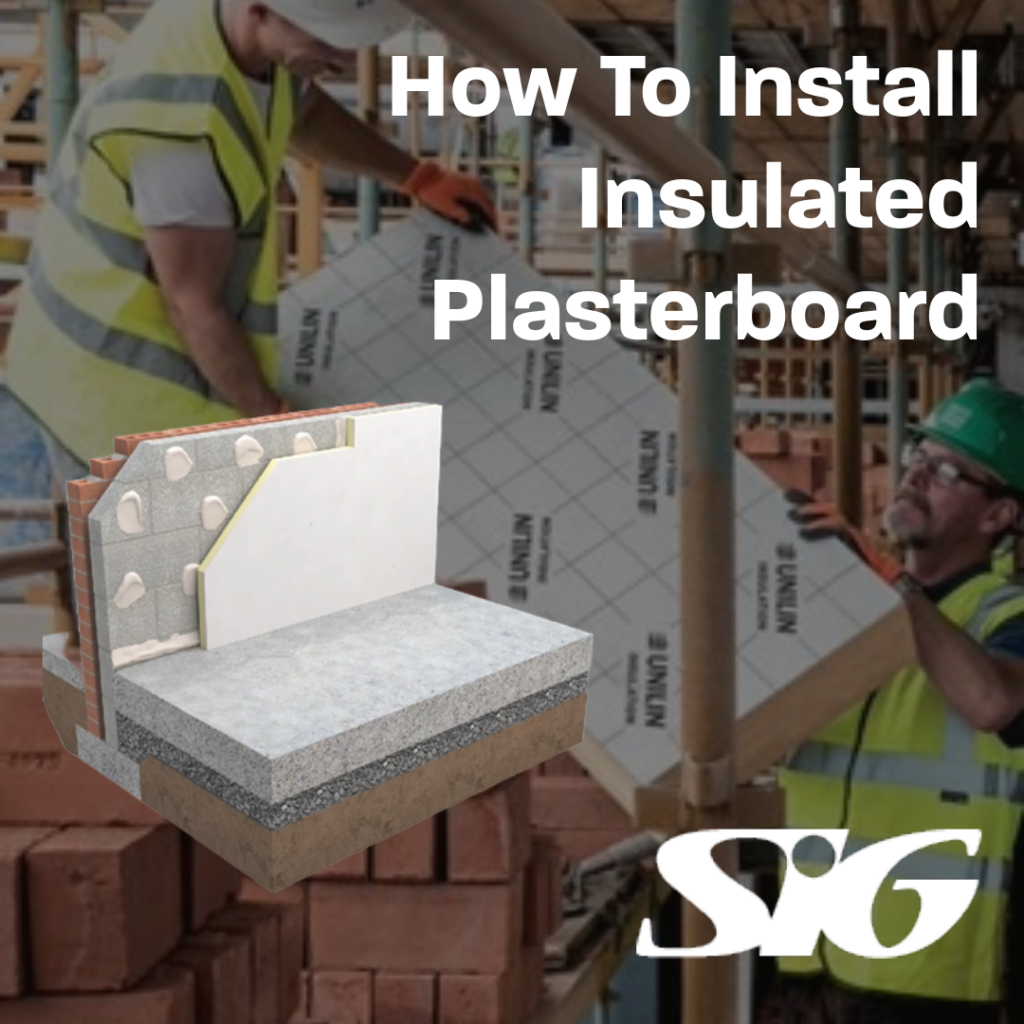
How to Install Insulated Plasterboard
You can fix insulated plasterboard to your walls, ceilings, or floors, using one of the following methods.
The Dot and Dab Method
To install your plasterboard using the dot-and-dab method, you’ll need adhesive bonding. While it’s not as suitable for ceilings and it’s not recommended for walls at risk of damp or made with timber or steel, it’s a straightforward option for other walls and can accommodate uneven surfaces.
The method is as it sounds – you’ll apply adhesive to the wall before fixing the insulated plasterboard to it.
- Mark the new wall plane on the floor and the ceiling as well as at 1200mm centres (or less, if the boards are smaller) to indicate where the boards should be placed.
- Start the installation process in an internal corner. Apply a continuous layer of adhesive to the perimeter of the wall and around openings. Remember, you’re looking to create an airtight seal here. If the wall is uneven, level it out by adding more to the applicable section.
- Cut the insulated plasterboards 15mm short of the floor-to-ceiling wall height and place them on packing strips. Tape them into position and keep them supported until the adhesive sets. Apply any fixings at least 25mm from the edge. 2 appropriate metal fixings are required for fire safety.
Screwing Plasterboard Directly Into Walls
Another option is to use special screws that you can insert into wall plugs embedded in masonry walls. There is, however, one catch when it comes to this method. Metal conducts heat and cold, so this method can lead to thermal bridging, making it a less attractive option.
In homes where the main walls are made up of a timber-panelled inner leaf, you can screw insulation boards into the existing timber stud work, whether that’s through existing plasterboard or not.
Before doing so, place a vapour barrier over the wall. This way, you won’t have to worry about moisture penetrating the inner timber leaf.
Using Adhesive Foam
Adhesive foams, such as InstaStik are commonly used for insulation installation. You can buy this adhesive foam in a can and dispense it using a nozzle. This foam adheres insulation to surfaces like timber, brick, or metal. Similarly, you can use it to apply insulated plasterboard to a wall using a similar technique to how you’d use regular adhesive.
Each can claims to last for five plasterboards, but in reality, you’ll get around three-four boards out of it. When installing, apply 30mm beads of adhesive around the perimeter of the board and down its centre. Let the foam go tacky for five minutes and install the boards. You should then add at least two masonry fixings per board.
Screwing to Lumber Battens
Before going ahead with this method, establish whether or not the walls are uneven. Uneven walls benefit from the dot-and-dab method because you can simply apply more adhesive to even out the walls. With uneven walls, however, screwing the insulating to lumber battens can be challenging – but not impossible.
If you’re determined to use this technique, you’ll need to pack out the battens to ensure that they’re level before you go ahead with the installation. You can do so using either a metal wall liner system or treated timber battening. Once that step is complete, here’s what to do next.
- Measure and mark the wall to indicate where the battens will go. Include surfaces, openings, and the edges of the walls. Before you get to the fixing part, add 100mm strips of damp-proof course to the back of every timber batten.
- Place the vertical battens at a maximum of 600mm centres and place horizontal battens at the top and the bottom. Make sure openings are covered, too.
- Fix the battens by drilling through the timber and into the wall then securing the battens in place using either wood screws and wall plugs or all-in-one alternatives. Make sure the penetrate the existing masonry by a minimum of 45mm and ensure the fixings are no more than 600mm apart.
- Fix the insulated plasterboards to the timber battens using screws at 200mm and 300mm centres around openings. Penetrate the timber with around 30mm or 10mm if it’s metal studding. The fixings should be placed 10mm+ inwards from the edge of the board.
- Once the insulated plasterboard is installed, seal gaps with expanding foam followed by a sealant. Skim the walls or tape and joint the boards as needed. You can then treat and decorate the wall as you would with regular plasterboard.
Can You Install Insulated Plasterboard Over Existing Plasterboard?
Insulated plasterboards can be bonded over existing plaster in a property. To do so, you’ll need acrylic sealant adhesive or low-expanding PU foam adhesive, but you can only apply it if the existing plaster is dry and in good condition.
How to Install Insulated Plasterboard On Plasterboard
While it’s entirely possible to install insulated plasterboard on existing plasterboard, there’s a fair bit of preparation that needs to be done first. Plus, you’ll need to ensure the plasterboard is in good condition before you go ahead. You’ll need to remove gloss paint and wallpaper from the existing paper. Failing to do so can lead to mould.
If, when you remove the wallpaper or gloss from the plasterboard you see signs of mould, treat them immediately before proceeding any further with the installation. You can treat it yourself using a fungicide or call in a professional.
Rather than peel the wallpaper, either sand the walls down or steam the wallpaper off the wall. Wait until the wall is clean and dry before moving ahead with installation. If you’ve used a fungicide, for example, you’ll need to be left to dry.
At this point, you’ll also need to cut the plasterboard to size to ensure it fits on your walls. Then you’ll need to use adhesive to install it.
Any window boards, skirting boards, existing wall units, dado rails, switches, and surface-mounted pipework will need to be removed and relocated as soon as the new lining is installed.
If you opt for a low-PU foam adhesive or acrylic sealant, you don’t typically need to use a bonding agent over the plaster first. These adhesive materials work well on low, medium, and high-suction substrates.
To install the insulated plasterboard on the plastered wall, apply adhesive blobs either directly to the wall or to the back of the plasterboard. The acrylic sealant adhesive should be applied to a diameter of approximately 25mm and positioned horizontally and vertically at 300mm centres. This type of adhesive sets within an hour.
If you’re using low-expanding PU foam, you can also apply it either directly to the insulated plasterboard or on the existing plaster underneath. Apply beads of foam around the perimeter and the centre of the board before applying the product.
How Do I Know If My Project Needs Insulated Plasterboard?
Insulated plasterboard is a great time and money saver, so if you’re working on a construction project with a particularly tight deadline or budget, it could be a good option.
Likewise, some forms of insulated plasterboard come with an in-built vapour barrier, so they’re worth considering if you’re concerned about the presence of damp in a property. It’s also a great choice for properties with size restrictions, as traditional insulation can sometimes reduce the space available within a room or loft.
If you’re renovating or building a smaller property, consider insulated plasterboard to solve two issues with one solution.
Insulation Advice and Supplies from the Experts
Making your next insulation project a success relies on two things – high-quality products and the right know-how. Luckily, here at SIG, we’ve got both in abundance. We’re Ireland’s premier distributor of insulation supplies and with years of experience supporting construction projects just like yours, we’ve got the supplies and the expertise to make sure every insulation job takes place without a hitch.
We supply some of the world’s most effective insulated plasterboard brands and our expert team is always on hand to give advice about your next construction project when you need it.
If you’re ready to make your next construction project quicker, easier, and cheaper than before with the help of the pros, visit our site today. We’re sure there will be something in our comprehensive range of insulation materials to fit your needs.